July 30, 2021


In this tutorial you will learn the basics of creating a section perspective drawing. We will cover everything from how you might want to use a section perspective instead of a section, to how to set up your model to create the drawing, to adjusting line weights. We will be showing you workflows for both Trimble SketchUp and McNeel’s Rhino modeling softwares and basics in Adobe Illustrator and Photoshop. There are many different ways to produce a section perspective and while you might not follow the exact same process as us, we have found that these simple workflows have worked well for us.

What you’ll need:
Modeling Software:
– Rhinoceros 3D
– Sketchup
Post Processing Software:
– Adobe Photoshop
– Adobe Illustrator


Introduction: Section or Section Perspective?

If you’ve seen a set of construction drawings, you’ve probably seen a building section. Sections are great for many reasons, so why would you want to mess with success?

Well, section perspectives can show more than a flat section can. Making use of depth to create a more visually compelling drawing and communicating a more complete idea of the building/space.

Sections

  • Visually simple and flat
  • Show essential information only
  • Good for showing elevation and vertical relationships

Section Perspective

  • Visually more complex, more closely replicates how our vision works
  • Shows depth
  • Contains more information
  • Better for conceptual drawings

Preparing Your Model

Section perspective drawings can contain a lot of information so you will want to be sure to limit the amount of excess information (i.e. hide any extra buildings, objects or anything else that might create visual noise and distract from your design.) When trying to decide what to include or not, consider the context. A building in an urban context might benefit from including some of its neighbors, which may be unnecessary in a more rural context.

Model Work: SketchUp

Step 1: Open your model

  • Be sure your model is the most current version!

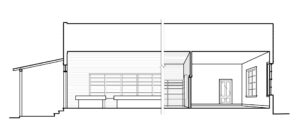
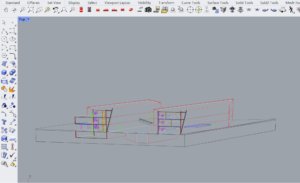
Step 2: Align your model

  • Consider what part of your building you would like to show. 

Some questions to ask are: Where will you cut? What will your section cut through? What is in the background? What direction will you face?

Step 3: Cut your section!

  • Using the Section tool, locate the plane where you want to cut your model
  • Tip: holding shifts locks the section into a single plane, so once you have aligned it, hold shift to make sure it doesn’t accidentally change before you cut your section.

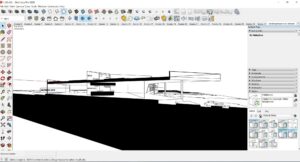
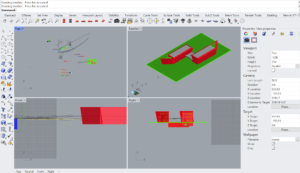
Step 4: Adjust your camera

  • Be sure to align your camera in SketchUp with the section
  • Select what kind of drawing project you want: perspective, two-point perspective, or parallel projection.
  • Tip: select a face that is parallel to your view then right click > align view to align your camera square to your model.

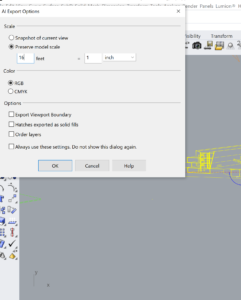
Step 5: Export your model

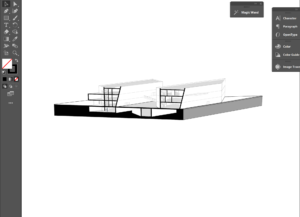
  • Basic section perspectives are normally composed solely of linework, to do this go to File > Export > 2D graphic and select your preferred file type
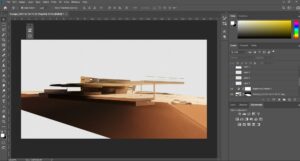
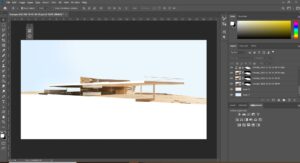
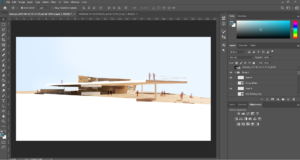
  • If you would like to render your model, many rendering programs have plugins available to can be accessed directly from your modeling software (e.g. Enscape in SketchUp) and we will cover a basic render with minor post-processing

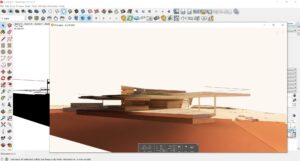
Step 5.5: Render your model

  • Using Enscape, set up your view in the Enscape scenes
  • Make the view two-point perspective
  • Adjust Enscape settings as necessary to achieve your desired look
  • Export your final rendered view

Model Work: Rhino

Step 1: Open your model

  • Be sure your model is the most current version!

Step 2: Cut your Section!

  • Using the Clipping Plane command, draw the plane that will cut through your model
  • Tip: adjust your clipping plane location in the top/front/right views for easier control and watch your perspective view change at the same time


Step 3: Align your camera

  • Move your view around the achieve the desired view
  • Tip: While not perfectly representative of how our vision works, we find that the best section perspectives keep their vertical lines straight

Step 4: Make 2D

  • Select your model (or only the objects you want included in your section perspective) and use the Make 2D command
  • Choose the appropriate settings, and click OK. It may take a little bit of experimentation to determine what settings are best for your particular project
  • The resulting linework will automatically be placed in your Top view


Step 5: Clean up your linework

  • Make sure to clean up any extraneous lines and separate your lines into appropriate layers.
  • If you anticipate using poché, be sure to close any open linework. Use the hatch command to see if your lines are closed

Step 6: Export

  • Select your linework drawing, and click File > Export Selected > Save as Illustrator File if you are going to use Adobe Illustrator for post-processing and final clean up of your drawing

Post-Processing

Your section perspective should be almost done! The last bit of drawing cleanup is best done in your post processor of choice. For linework, Adobe Illustrator is a good choice. If you want to incorporate rendered elements, Adobe Photoshop might be a better option as it gives you more control over the image adjustments.

Post-processing: Adobe Photoshop

Step 1: Import your rendered view

Step 2: Trim and clean up the image as required

  • Make sure to remove any extra or distracting objects from your image

Step 3: Import linework from SketchUp (Optional)

  • If you want to add a bit more definition to your drawing, you can layer the linework from SketchUp on top of your rendered view

Step 4: Edit as Desired

  • Make any adjustments to the image (e.g. brightness/contrast, color levels, hue/saturation)
  • Add sky or background


Step 5: Add Final Elements

  • Add poché if desired
  • Add scale figures or other entourage elements


Step 6: Save it!

  • We suggest saving it as a high quality JPEG, or PNG/TIFF if you have transparency

Post-Processing: Adobe Illustrator

Post-Processing: Adobe Illustrator


Step 1: Open your file

  • Illustrator file from Rhino, PDF or other file type from SketchUP

Step 2: Layers

  • Move linework to appropriate layers
  • Tip: We suggest having multiple layers for ease of editing
    • 1 layer for the cut line or poché
    • 1-2 layers for background linework
    • 1 layer for entourage
    • 1 layer for additional elements

Step 3: Edit Linework

  • Adjust the color and lineweight of your linework

  • Add and poché, or fill, to your drawing

Step 4: Add Final Elements

  • Add any scale figures or other entourage elements

Step 5: Save it!

  • We suggest saving it as a high quality JPEG, or PNG/TIFF if you have transparency